Tuesday, 16 December 2014

Listing the directory structure into CSV format | Python

In order to avoid complicated population of databases, by filename and containing folders, we can in turn switch to saving data in csv file formats.

The problem encountered was:

I had to create a database having 5 fields:

'object', 'category' , 'filename', 'source', 'date'

source was a fixed string and date can easily be found in python by importing the time lib as shown in code below.

Directories were in this order:

category<object<filename

Elaborating, in my root folder , I had several category folders, like Animals, Musical Instruments, Vehicles etc and inside them I had further sub-folders like in Animals, I had dog, cat etc and so on for other folders. Further in this subfolder I had .mp3 and .wav files . I need to have this directory structure presentable in csv format as discussed above.

Doing this manually for above 2000 files is a herculion job, here is the script to simplify it:


import os
import csv
import time

def list_files(dirpath):
    files = []
    for dirname, dirnames, filenames in os.walk(dirpath):
        files += [os.path.join(dirname, filename) for filename in filenames]
    return files

now = time.strftime("%c")
path = '/home/infinite/findsounds'

files=list_files(path)

with open('/tmp/final.csv', 'wb') as csvfile:
  writer = csv.writer(csvfile)
  writer.writerow(['object', 'category' , 'filename', 'source', 'date'])
  for file in files:
    if file:
     
      filestr=str(file)
     
      directories = filestr.split("/")
      writer.writerow([directories[5],directories[4],directories[6],'www.findsounds.com', now])

Please take care of the indentation while copying.

A view of CSV generated (Libre Office, comma separated view):


Small piece of code, hope it helps.

PS: Feel free to drop your suggestions/queries below.

Keep Scripting!

Monday, 15 December 2014

Creating websites using PHP embedded HTML| Incorporating MySQL database

So, in a process of developing this website, I will be jotting down all the prerequisites and the steps thereafter in order to make a php website live online.
Hope it will help the struggling newbies in this field.

Before moving on, let's understand:

I. What's PHP?

PHP, the term derived from "Hypertext Preprocessor", is a server-side, HTML embedded scripting language used to create dynamic Web pages.
As it's server-side related application it does not require any configuration at the client's/viewer's side since the code itself is executed on the server where it's residing.
All that is required is any Web browser currently existing, but that will not suffice to develop php websites, we need to set up a website development environment. (We will be looking after it a bit later. )
Having the PHP as an embedded implementation at the HTML pages within the special PHP tags at the server side no one would be able to access the code itself through the browser as being able with the plain HTML language.
It's syntax parts is borrowed from other languages as C, Java and Perl with some unique features thrown in.
The main goal of the PHP oriented language is to provide the easiest way of generating and developing dynamic Web pages to the developers or site designers.
The PHP language offers an reliable connectivity services to the various database services like MySql etc. The database management tool phpMyAdmin, most popular bullet in board interfaces like PHPBB or PHPNuke are related on the PHP language as well. Internet related connection services as e-mail, email via POP3 or IMAP, url encoding, cookies, redirections etc. are available through the PHP as it's web oriented.
[Source: http://www.oxxus.net/tutorials/php ]
So for this particular website we will be using MySQL for the database.
If you have heard the term "PHP" in your life for less than 7 times, you are recommended to view source of this website to understand what php enabled websites look like at the back end part.
Go to this website, right click and select "View Source", there are three PHP scripts running in the back end.  http://www.neil-kb.com/

II. TOOLS WE WOULD  BE NEEDING:

1. MySQL
2. XAMPP
3. PHPMyAdmin
4. Text Editor
5. Local Host settings....may be. 

Go to this link to dive deep:

Install XAMPP by following these steps:
http://computernetworkingnotes.com/ubuntu-12-04-tips-and-tricks/how-to-install-xampp-1-8-2-in-ubuntu.html

Have SQL installed and configured.


III. Three main youtube videos that will get you started with dynamic websites are these:
What is actually happening?

Unlike the static html pages, this time we need the content to be displayed dynamically by running a php script.
So, the php script senses the argument passed and accordingly loads the corresponding page. PHP facilitates to interact with MySQL or other databases and get the content loaded from there.
This is briefly what is happening in the following videos, have a glance.
 
1. https://www.youtube.com/watch?v=G4DZW9IFQ_U


2. https://www.youtube.com/watch?v=HFZbW9eDRAM

3. https://www.youtube.com/watch?v=SETjgigQmBE

Also, this may help in the process of learning:

https://www.youtube.com/watch?v=IMuhWHO_T-0


So, hope the content and links would prove useful.

Keep hacking!


Wednesday, 16 July 2014

Removing dual boot when you have deleted ubuntu already

Hey folks!

It happens at times that you have two OS running on your laptop say Windows and Ubuntu and you have been successful in establishing dual boot for them back in time but now when you don't need one OS and deleted (say Ubuntu) forever, still dual boot option appears, do you want to get rid of that?

Here is a simple technique I discovered.
 Just run command prompt as administrator (right click cmd and select run as administrator).
Then typr these commands:

>bcdedit

This willl display a list of your boot options, now find the identifier for Ubuntu. It would be enclosed within curly braces.
Say your identifier is {GUID}. It can be a lengthy string too.
Now type:
>bcdedit /delete{GUID}

Operation successfully completed. This marks the end of dual boot.

Hope that helps!
Stay cheered. 

Friday, 27 December 2013

Experimenting with Ubuntu...establishing internet

Hi there! Finally a post after a long time!
I have been experimenting with ubuntu these days! The first thing we need is internet. Perpetual connectivity is one thing we strive for!

So this post intends to cover two major issues I came against while establishing internet on Ubuntu. Ubuntu works in quite different way than windows so the BSNL or ISPs might not help you much in this case!

Initially, I tried establishing mobile internet (!dea Netconnect dongle), recently I tried establishing BSNL Broadband Connection.

Lets first talk about what is still fresh:

ESTABLISHING BSNL BROADBAND CONNECTION:

If you have already experimented a lot then you might be suffering a problem where wired network is  "unmanaged".

Solution:

First, remove the existing network configurations for eth* from /etc/network/interfaces. So the resulting /etc/network/interfaces will only has the following loopback interface.

auto lo
iface lo inet loopback


PS: If you are new to Ubuntu you might be finding difficulty to edit the file due to read only rights. Only root can modify the file. So I would suggest opening the file through terminal using this command:


$sudo gedit /etc/network/interfaces


Note: sudo helps you to access files as root.You are asked to enter the password before the file opens. Make the asked changes. The changes can be saved now.

Now, enable wired network settings on NetworkManager by changing "managed=false" to "managed=true" in /etc/NetworkManager/NetworkManager.conf.

NOte: Open the file in the same way as above.

[ifupdown]
managed=true
Finally, restart NetworkManager to reload its configuration.

$ sudo service network-manager restart
Once you restart NetworkManager, you will be able to edit wired network settings in System Settings -> Network -> Wired.

Next , issue you would face is configuring the modem and defining the access point. Here it goes:

  1. Connect your ethernet wire to the port at the back of your computer.
  2. Fire up the terminal and type in sudo pppoeconf
  3. It should detect your modem.
  4. Keep on pressing enter. Fill in your user name and password when indicated.
  5. It should be easy to stick on to defaults.
  6. You should be prompted back to your terminal when it would say pppoe loaded. Simple. That's the end of terminal. Now go to System>Networking. Click on it
  7. Activate the Wired connection.
  8. Highlight the wired connection and click on properties.
  9. Check the box "enable the connection"
(Source: askubuntu.com)


These would definitely sort out the issue for you. Let's come to establishing net connectivity via mobile internet:

1- get the a readymade Script

If the link doesn't works, make a file named MobileBroadband-autoconnect.sh
with this Script:

#!/bin/bash

while true; do
    LC_ALL=C nmcli -t -f TYPE,STATE dev | grep -q "^gsm:disconnected$"
    if [ $? -eq 0 ]; then
        #jdownloader is still in the download status so stop it because
        #internet is disconnected and jdownloader won't resume download
        #when connected again
        #jdownloader --stop-download
        #sometimes I can not get connected after disconnection when
        #I click on <name of the network connection>. I have to disable
        #and enable Mobile Broadband
        nmcli -t nm wwan off
        sleep 1
        nmcli -t nm wwan on
        sleep 1
        nmcli -t con up id "Tunisie Télécom / TUNTEL WEB DATA"
        #wait approximately 15 sec to get connected
        #if anyone can add better command to check for it just comment it :-p
        sleep 15
        #now connected to internet so start download
        #jdownloader --start-download
    fi
    #it does not worth keep it checking every millisecond.
    #my connection will be reestablished within 5-15 seconds
    sleep 2
    #if anyone can code it better please feel free to comment
    #TO-DO:: check for data received. if data < 15 KB after 20 seconds of connection
    #reconnect mobile broadband connection 
done


2- extract it to your home folder (or somewhere safe) and make it hidden by placing a period before it like this .network-autoconnection.sh (so that you won't accidentally delete it)

3- Give it execution permission like this: right click on it, go to "properties", then navigate to "permissions" then tick "Allow executing file as program"

4- go to t/media/infinite/New Volume/100/MobileBroadband-autoconnect.shhe Mint menu and type "startup applications"


5- click on "add" then "browse" opposite to "command" field to give the directory of the script (your home folder or wherever you've placed it) then give it a name in the "name" field, for example mine is "Tunisie Télécom / TUNTEL WEB DATA".


That's it guys!
Hope this may help you and you have your internet up and running!
Do drop by queries if you have any! :)

Thursday, 30 May 2013

Ruby on Rails with MongoDB

Lots of new techniques and web development simplified! As a part of some project I came across these names "Ruby on Rails", "MongoDB", "Mongoid" and these followed by several doubts! What is rails? What is MongoDb? How to incorporate MongoDB on rails?
So I decided to put it up on my blog to simplify and encapsulate the steps needed to be performed in order to get through it!

Ruby on Rails  is one of the most easy and efficient tools for creating any website! Especially those which have a database management system linked to it.
Ruby on rails with mongodb is one of the easiest ways to create data management website!

For more information about the two you can have a look at these links:
>> Ruby on rails
>> MongoDB

I struggled a lot to incorporate MongoDB and hence here follows a step by step instruction guide in order to have your rails running:

Lets create a demo app to understand it, open the command prompt with ruby on rails and navigate to the folder in which you are creating your rails projects:

>cd rails_pro
>rails new demoApp --skip-active-record

The folder demoApp will be created in the specified directory, now open the folder and open Gemfile in text editors like Sublime Text2, and add these two lines:

gem 'mongoid', "~> 3.0.0"
gem 'bson_ext'

Now...lets add a controller to our app...switch back to command prompt and type:

> cd  demoApp
> rails generate controller students

this command would create students_controller.rb in app>controllers and a students folder in app>views.
We will write code for these later, first lets create a model (which actually defines database) as follows:
Come back to cmd, type
> rails generate mongoid:config

This will crete mongoid.yml file in demoApp\config folder!
Further type:
>rails generate model student
This will create student.rb file in app\models folder.

Done? Now lets write code in these files:
>>1. Open student.rb in Sublime Text 2 and type:


To keep it short and simple, lets add just 3 functionality to the model/ table:
1.  list : will list all the existing records (will have corresponding view)
2. new: will display form to create new student's record (will have corresponding view)
3. create: will actually create the record (no corresponding view)

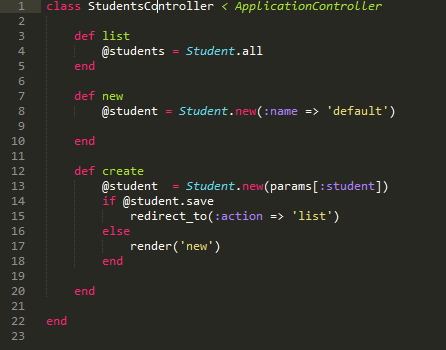
>>2. Now open students_controller.rb in Sublime Text2 and type:


>> Now lets develop corresponding views, create a 2 new files list.html.erb and new.html.erb, type the corresponding code (shown below) and save them inside app\views\students folder:


Its all done! Now comes the main step, but before that ensure you have done this:
# Open config\routes.rb and  remove # from the last line, so that the line is included:
match ':controller(/:action(/:id))(.:format)'

# Remove files from app\assets\javascripts and app\assets\stylesheets, these unnecessary cause ExecJS error!

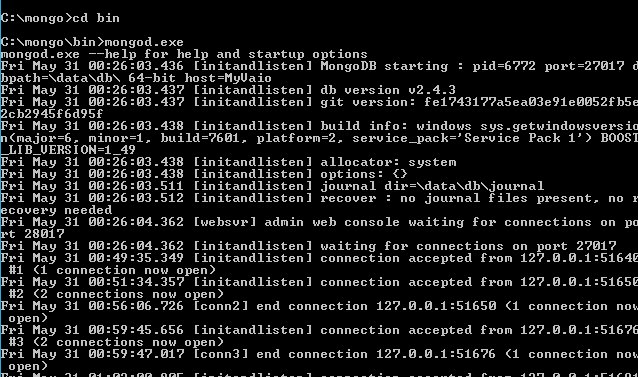
Lets move to cmd now, open one more cmd and navigate to the directory where you have unzipped mongodb  and run command mongod.exe:


Leave this cmd as it is, and in the first cmd, type:
>bundle install
>rails s

Now switch to web browser and type: localhost:3000/students/list


You will get a view like this if any previous records are inserted, if not then "1 default" won't appear!
Type in URL: localhost:3000/students/new


Enter the details, click create, now when you move back to list, the new added record will be displayed! Hence you are able to establish connectivity between mongodb and RoR :D

This worked pretty well for me, hope this would have helped you! For any further queries do leave a comment I will get back to it asap.  

A secret love message ~

Hmm, so the trick of putting up a catchy seasonal title worked out, we got you here! Folks, we will be talking about a really cool tech...